I’m back to continue with my tutorial in how to work with My Memories Suite Quick Pages in Microsoft Word and how to save the Quick Pages made up in Word in a .jpg format. The last thing I had explained in my previous tutorial was how you can place a Word Art on the zipper pull. You can also maybe place a picture on the zipper pull. There are a lot of creative things you can do with these Quick Pages. So if you want to place a picture on the zipper pull, first open a new blank Microsoft document, and insert your picture the way I had described in the previous post. You can also insert a picture in your blank document by going in the file where you have saved your picture, then right click on the picture without opening it and choose for the ‘Copy’ option. Come back to your blank Microsoft Word document, then right click on the blank page and choose for the option ‘Paste’. So now you have your picture on the blank page.

The second step is to change the shape of the picture. You can choose from a lot of shapes, like you can give your picture the shape of a sun, a cloud etc. I’m going to choose for the ‘Oval’ shape cause the zipper pull has an oval shape. Make the picture smaller by pushing the little circles at the corners. Now right click and choose for the option ‘Copy’. You now have to get this picture in your previously saved document. So open that document, then right click and choose for the option ‘Paste’.

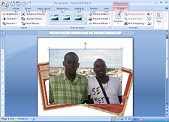
You now have your oval shaped picture on your page together with your Quick Pages. Click on the oval shaped picture, then click on the red ‘Picture Tools’ tab at the top. You can now change your Text Wrapping. Choose for the option ‘Behind Text’ from the Text Wrapping pull down menu.

I want my Word Art on top of my picture so I’m going to drag it somewhere on top of my page. The oval shaped picture is still too big and it needs to be stretched out in order to get the zipper pull shape. Give the picture the angle of the zipper pull in the way done previously by rotating the oval shaped picture. You can zoom in a little bit to get a closer look. Just move the zoom tuner, at the bottom, to the right; you will see that the percentage will go up. So this is what you will get.

Now right click on your Word Art and choose for the option ‘Order’ and then click on ‘Bring to Front’. You can now drag your Word Art on top of your picture. You can also change the shape of your Word Art if you like. Simply click on the ‘Change WordArt shape’ tab (on the little triangle of a blue ‘A’ that you will see if you click on your Word Art tab), and choose for a shape. I’ve chosen for ‘Arch Down (Curve)’.

I want my Word Art a little bit brighter so I’m going to choose for a brightness of +10% for my oval shaped picture, then I’m giving my Word Art a shadow and I’m going to outline the Word Art with a dark blue color. This is what I am getting.

This week, the pictures on my blog are clearer, cause I’ve used my My Memories Suite software to resize them.;) Now I want to be able to mail the picture I’ve made up or to be able to place it on Facebook or whatsoever. So what you should do now is to press together your ‘Alt’ and ‘Print Screen’ tab on you keyboard. The next step is to open a blank page in Paint. I think that you guys know how to open a blank page in Paint. I’ll give you one of the options how to open a blank page in Paint. Click on ‘Start’, then go to ‘All Programs’, then go to ‘Accessories’ and then click on the ‘Paint’ option. So you will now get a blank page in Paint. Now click on ‘Edit’ and choose for the option ‘Paste’. You will see your whole Word Screen in Paint now. Save this Word Screen in Paint.

Now for the final step; go to the location where you have saved your Paint document and right click, then go to ‘Open With’ and choose for the option ‘Microsoft Office Picture Manager’. We are now going to crop those areas that we don’t want in our picture to be shown. Click on ‘Picture’ in your ‘Microsoft Office Picture Manager’ and choose for the option ‘Crop…’. You will get a crop toolbar on the right.

Move your picture borders inside with your mouse held in to crop those areas that are not needed. This is what you will get; you can see that the black corners and the black small lines in the middle have moved.

Now click on ‘OK’ on the side bar and save your modified document by clicking on ‘File’ and then on ‘Save’. Your picture is ready to be shared with friends and family!!! This is what I finally got.;)

Although no one has participated in my Quick Pages giveaway this time, I have my winners for this week!!! This is the pack that the winners Meenu and Francesca have received because they had participated in my My Memories Suite V2 software giveaway on my blog CREATIVE D-ZINE and I don’t want to leave the participants of my software giveaway empty-handed. Do participate next time everyone! You can use all your creative ideas to work with the 2 Quick Pages of my giveaway.

This is something I’ve created with the My Memories Suite software using pictures I had taken in our garden and using some items from this software. The cupcake paper is from the free kit ‘This is My Day!’, and the background is from the free kit ‘Honeycomb Solids’. If you purchase this software, you can download all the free kits at http://www.mymemories.com/. Use the coupon code STMMMS35043 to get a 25% discount on your MMS software.;)


Ciaoooo everyone!!! Come and get your new Freebies out here next week!;)