

I hadn’t posted anything out here for quite some time. I’ll try to share some scrapbooking tips and tools out here now on a regular basis.
Today, I again have something special for all of my blog visitors. Any guesses? Freebies for all of you guys!!! The freebies include 2 Quick Pages, and all the papers and elements used in creating them. The Quick Pages can be used in any software, like Microsoft Office, Photoshop, AutoCAD etc. But I encourage you to try the My Memories Suite Version 2 software if you still haven’t bought this software. You can get a $10 discount when you use the coupon code STMMMS35043 to purchase the My Memories Suite v2 scrapbooking software at www.MyMemories.com. Software also comes with a $10 coupon for downloads-a total value of $20! Just copy and paste the code to avoid typos when using it.
The elements and Quick Pages are .png and the papers are .jpg format. The Quick Pages and the Papers and Embellishments are for Personal Use Only, and are not to be used for any commercial use-either for profit or gratis.
How do you guys like these 2 Quick Pages?

This is the link for everyone to download these Quick Pages for free:
Sorry, link has expired. Check out my newest post for new freebies.
For those who haven’t bought this software, I’ll show you how you can work with these Quick Pages in Microsoft Word. I think that everyone has Microsoft Word on his/her mac or pc and knows to work with it. But for those having a little bit of problem I’m giving you step by step instructions this time.
I’m going to work with a picture I had taken of one of my friends and his friend. First you place your desired embellishment(s) with which you want to work, on your blank page of your Microsoft Word Document. You can get your embellishment(s) on your page by clicking on Insert and then clicking on picture. Choose the file where you have saved your downloaded embellishments and insert the embellishments one by one. I’ve chosen for QP1 en QP2 to work with for this example.

I want the two embellishments next to each other, so I am going to make them smaller by clicking on the picture and then pushing on one of the little rectangles at the corners of the pictures in a downward or upward way. The next step is to click on one of the embellishments, then right click and click on ‘Text Wrapping’ and now choose for the ‘Behind Text’ option in your pull down menu. Do the same for the other embellishment. This way you can place the two embellishments side by side without any problems.

I am now giving these embellishments an angle. You can do this by clicking on the embellishment you want to rotate and holding your cursor above the green dot that you can see in the picture above. When you see arrows around the green dot, hold your mouse down and move the cursor the way you want to rotate your embellishment. Now you can insert your pictures and this goes in the same way you had inserted your embellishments.
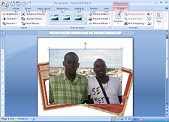
Click on your picture and push on one of the little circles at the corners of the picture to get the picture smaller. Now try giving your pictures the same angle you had given to your embellishments in the same way as described before. Do the text wrapping for your pictures as well and send them at the back.

Now for the final part; click on one of the embellishments and then right click on ‘Bring to Front’ and then again on ‘Bring to Front’. Do this step also for the other embellishment. You can play a little bit around if you’re not satisfied with how the items are placed.

You can also add a Word Art on the blank zipper pull if you want. Click on insert; then choose from a Word Art from the Word Art pull down menu. Click on your chosen Word Art and then type your text and click on OK. Now you right click on your Word Art, and then click on ‘Format WordArt’ and then you choose for the option ‘Behind Text’ for the layout. You can now give your Word Art an angle and drag it to the right place.

Sorry that the pictures are unclear, I had to resize them to be able to place them on my blog. That’s it for today; so save your Word file! I’ll tell you next week how you can save these two Quick Pages as one picture and use it on Facebook, Twitter, your blog or for mailing it to your family and friends.;)
I’m giving away a Quick Page to some lucky winners next week. Leave a comment with your first name or nickname together with your e-mail address in the comment section of this blog post to participate.
Enjoy life, have fun, dream, explore, play, be adventurous, create, run, skip, jump, laugh and smile,
Sharda
Check out my blog http://creative-d-zine.blogspot.com if you want to know more about the My Memories Suite software.;)
ReplyDeleteThank you so much for stopping by my blod this morning! I always love discovering and becoming friends with new treasures of the blog world....Have a blessed Sunday
ReplyDeleteThanks for stopping by my blog. I am your newest follower.
ReplyDeleteInteresting suggestions, always very interesting, congratulations!
ReplyDeleteUnfortunately, human development, especially the West have created a degree of prosperity that is proving a boomerang.