

I’m back with my first My Memories Suite tutorial. Follow my step by step instructions if you have purchased your software recently and you need some guidance to work with this software. If you still haven’t purchased this software you can always use my coupon code STMMMS35043 to get a $10 discount. Software also comes with a $10 coupon for downloads-a total value of $20! Just copy and paste the code to avoid typos when using it.
You can open your My Memories Suite Program by double clicking on your My Memories Suite icon or by clicking on ‘Start’ and then on ‘My Memories Suite’. Your ‘New Album Options’ window will open.

You now have two options from which you can pick; you can create an album with a designer template or you can build your own album. What you see at the bottom of this window are thumbnails of my recent albums. When you want to continue with your album some other time, you can easily click on the album you were working on to pursue further with your work. I’m going to work with a designer template today, so click on ‘Create Album From Designer Template’. A ‘Choose Designer Template’ window will open up now.

So now you have to choose a designer template. You can see how the designer templates look like on the picture at the right corner below. What you see on the picture above is how the template ‘A Day in the Life’ looks like. What you also may have noticed is that all templates come with a name, a theme, a size and the amount of pages they contain. The templates come in 8½" x 11" and 12" x 12" sizes, but you can convert them into other sizes. ‘A day in the Life’ contains 7 pages, so when you have more pictures, the 7 pages will repeat itself when you choose for the ‘Fast Fill’ option. Christmas is not far away, so I’m now going to choose for the ‘Holiday Simplicity’ template.

This template has the theme ‘Christmas’, it has a size of 12" x 12" and it contains 7 pages. So now click on ‘Next’. You will get a ‘Custom Page Arrangement’ window.

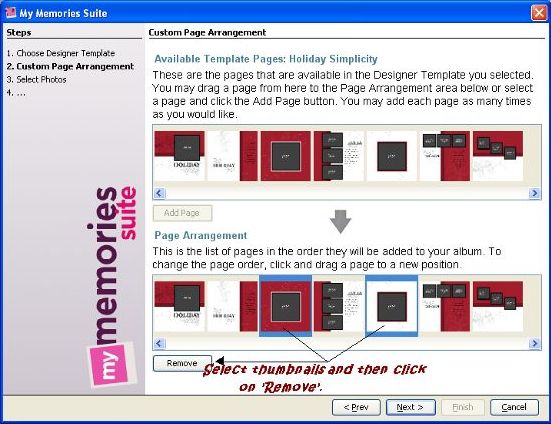
You can now remove, add, and/or place your pages in the order you like. To arrange the pages in a different way, simply drag the thumbnail images of your pages to the place where you want your pages in the ‘Page Arrangement’ bar. If you want to place some more pages, drag the thumbnails you want from the ‘Available Template Pages’ bar to the ‘Page Arrangement’ bar below. If you want to remove some pages, click on the thumbnail on the ‘Page Arrangement’ bar, which you want to remove and then click on ‘Remove’. If you want to remove more then one page, hold your control key in and select those thumbnails and then click on ‘Remove’. I’m going to remove the 3rd and the 5th page and I’m going to add the last page as my third page now.

I now have 6 pages, but you can add as many pages as you like.

Now click on ‘Next’ when you’re done adding and removing your pages. You will now get a ‘Select Photos’ window from which your can choose from two options: ‘Pick and Click’ and ‘Fast Fill’. You can choose for the ‘Fast Fill’ option when you have lots of pictures and the order of the pictures isn’t important. For example, when you want the hundreds of pictures that you had taken on your campus trip quickly put together in an album, this is a great option. I’m going to work with the ‘Pick and Click’ option today.

Click on ‘Next’ if you have selected your option. You will now get a ‘Name Album’ window.

You can now change your Album Name and location if you like. I’m going to name my album ‘Jingle Bell’. And the next step is to click on ‘Finish’.

You now have your album opened in your ‘My Memories Suite’ software. This is the page that you will get.

At the left you have your ‘Resource Gallery’ and at the right you have your ‘Control Panel’. I’ll talk about these two in my second tutorial. You can see all the thumbnails of your pages in the bar at the bottom, so if you want to go to your second page, simply click on the thumbnail of your second page to view this page. You can also delete or drag your thumbnails in this bar. I’m going to keep it short this time; I’ll show you how you can add pictures to these templates. To add a picture, double click on the dark square area that you see. You will get an ‘Add Photo’ window now.

Go to the file where you have saved or stored your picture, then select your picture and then click on ‘OK’. You can choose from selecting the name of your picture or clicking on the thumbnail image on the right. I’ve chosen to click on my thumbnail image on the right. I hadn’t placed any pictures of our cat Kido out here for quite some time.:)

Now, I have my picture in the picture frame of my template.

You can select the area that you want to be shown in the picture frame by double clicking on the picture. You will get your ‘Crop Photo’ window now.

So I’m just going to drag the bright area a little bit to the left. Click on ‘OK’ when you’re done.

So this is what I finally got.

That’s it for today’s tutorial. You can fill the other pages with your pictures if you like. Click on ‘File’ and then on ‘Save’ to save your work.
What do you guys think of this week’s Quick Pages?
What do you guys think of this week’s Quick Pages?

Here’s the link for everyone to download these Quick Pages for free: Sorry, link has expired. Check out my newest post for new freebies.
I have great news this week; My Memories Suite is giving away an iPad 2 to a lucky winner very soon!!!
Do participate in this great giveaway of My Memories Suite. The only thing that you have to do is to like and share their page on Facebook at https://www.facebook.com/pages/MyMemories/140359372717593 . You can find the details at http://www.mymemoriesblog.com/2011/09/so-make-sure-you-check-out-mymemories.html . At the moment, they’re on 9,740 followers on Facebook, so be fast before they reach the 10,000!!! I would love it if not me, one of my followers would win this very cool giveaway.;) Nobody loses, cause you can download a Christmas kit for free on their Facebook page, just for liking their page.;)I’m giving away another set of Quick Pages to some lucky winners next week. Leave your first name or nick name together with your e-mail address in the comment section of this post to participate in my giveaway.
And do visit my blog next week; I have something very special to share with you guys!;)
Hugs and kisses,
Sharda
Dear Sharda, too many compliments and thank you, you have a blog very technical, with the operations and I am lost too difficult!
ReplyDeleteA good day to you, kiss
thanks voor het delen dit is wel heel leuk!!!
ReplyDeleteBedankt voor je reactie Loes.;)
ReplyDeleteIvo, this software is so easy that even a 5 year old will be able to work with it.;)
Wishing everyone from Suriname a happy Srefidensi (36 th Independence day!!!
Your a true guide! thanks for the helpful article!Designer CV Templates
ReplyDeleteHey Bose! Thanx for your sweet comment; really appreciate it.;)
ReplyDelete