Showing posts with label My Memories Suite. Show all posts

Wednesday, June 27, 2012

Purse Card Freebies

Hey everyone!
I’m back with new freebies!
Here’s the link for everyone to download these freebies: http://www.mymemories.com/store/share_the_memories_kit_3
You do need your My Memories Suite software to work with these freebies. If you don’t have this software yet you can participate in my My Memories Suite software GIVEAWAY. Everyone can participate and it’s open internationally; check out my previous post for details.

I have a tutorial for you from My Memories Suite on how to work with this week’s Purse Card freebies:
1. Print your Purse Card templates on cardstock and gather supplies. (Recommended supplies: small craft scissors, bone folder, 8-12" of ribbon, stapler, tape or velcro)

TIP: To print your information on the inside create another page with the template in place. Put all your text and embellishments in (leaving a little room on the edges) and then remove the template right before exporting or printing the inside page on the back of the first. This will keep from having to worry about if the templates line up exactly when cutting out your card.


2. Using the scissors cut along outside line.

3. Fold card at indentations.
TIP: Using a bone folder will help you get crisp edges on your project.

 
4.  Repeat by folding down top flap.

5.  Staple ribbon to both sides of your card on the inside to look like a strap or handle.

6.  Enjoy the finished cards and share.  Don't forget to use your imagination.  The possibilities are endless!

I created a gift bag with this week’s freebies by adding some extra pieces to the layout. I can place some gifts in my created shoulder bag and gift it to someone.;)


See you guys next time!
Hugs
Sharda

Tuesday, June 12, 2012

MMS V3 software giveaway!!!


I am inviting everyone to participate in my 3th My Memories Suite scrapbooking software giveaway which is sponsored by My Memories Suite!!!
Grab your chance to win this fun software with which you can create wonderful scrapbooks, cool postcards, amazing gifts and lots more within minutes. In my last giveaway Meenu from Suriname had received this software totally FREE and without any competition, cause although I had received lots of comments, only one person had participated in my giveaway. The rules are very simple, and this competition is open for kids as well as for adults, so don’t wait and watch this time.
My Memories Suite is standing on the #1 position of all the digital scrapbooking softwares in the world.
Here are the rules for you guys to participate in this giveaway:
·         Follow this blog publicly via Google Friend Connect. If you already are a follower, you can skip this step.
·         Go to www.MyMemories.com and pick a favorite kit from the Free Kits. Come back to my blog and tell me in the comment section of this blogpost which of the Free Kits you liked most. Do leave your first name and e-mail along with the name of your favorite free kit in the comment section so I can contact you when you are the winner.

Extra entries (+2) for people who have a blog and want to blog about this giveaway or want to place it on their sidebar or you can also earn extra entries by tweeting about this giveaway or telling your friends about this giveaway through your fb wall. Do let me know if I have to count you in for extra entries.

If you have any problems at all, you can e-mail me at ssewdien@yahoo.com .
Contest ends on the 11th of July 2012 at 12.00 AM EST and it is open internationally.

If you aren’t lucky this time and you still want to own this software, you can always use the discount code STMMMS35043 to get $10 off your purchase!

This is the cover of the invitation card I had created for my granny’s 80th birthday. I had used Flutters My Eyes Quick Page and Cutout-Green frame which comes with the software. You can easily give your text a matching color with the picker option. I actually don’t have a printer of my own, so I had exported my layout in a JPEG format and gave it a green border in Microsoft Word to print it out via my dad’s laptop. I added a smiley on granny’s face cause I haven’t asked her permission to place her picture on my blog.


I had created these long back with freebies. You can easily create different layouts using a single quick page; turn around your quick page with one click for your next page(s) of your scrapbook with this software. You can also let your text follow a certain shape.


This is a postcard I had created with embellishments from the My Memories Suite scrapbooking software. I also gave this card a border in Microsoft Word.


I hope that you guys have saved the freebies from previous time; I had left the link to the Doorknob Hanger freebies open for you guys. I took some time off after my thesis presentation, that’s why I haven’t created any samples. This is a sample that I received from Liz.


Here’s the link to this week’s freebies: http://www.mymemories.com/store/share_the_memories_kit_3
If you are participating in my giveaway, you can also save these freebies if you like, in case you are the winner or if you are about to purchase this software later on. Kids love crowns, weather it is for a birthday party or just for being a prince or princess for a day. At Hindu weddings out here in Suriname, sometimes the aunts who bake grains and popcorn also get a crown and funny vegetable necklaces for fun. You can customize your crown with pictures or ages or however you like. Here’s a sample from Liz for you guys.


Check out my previous posts for more samples created with My Memories Suite scrapbooking software.
Hugs and best of luck everyone!
Sharda


Friday, March 23, 2012

Extra freebies this week!

Hey everyone!
I have something very special for you today! Guess what I have for you guys today...Candy Wrapper Freebies!!! I am pampering you guys with two sets of new freebies this week! These freebies can be used in any software, but I’m recommending the MMS software. If you don’t have this software yet, you can order it using my discount code STMMMS35043 ; you will get $10 off your MMS software purchase when you use this code at http://www.mymemories.com/ ! And remember, when you purchase your software using my code before the end of this month you will be eligible to receive a one year free RAKStar Membership worth $247.35!!! Isn’t that wonderful! Just mail me your receipt at ssewdien@yahoo.com for your free mega gift!;)
Here’s the link for everyone to download these freebies:
link to these freebies has expired; check out my newer posts for new freebies.
And here’s a sample I received from Liz.


You will definitely put a smile on your friend’s face by gifting a candy with a very special wrapping to him or her.

Here are the steps for you to create this candy wrapper:
• Open you’re My Memories Suite software and choose your album size (Liz has choosen 8.5 x 11” )
• Add the papers and elements you wish to use to create your own printable project
• Click ‘SHARE ALBUM --> EXPORT PAGES and save as a .jpg! The new .jpg papers you created are now usable as stand alone printable projects to use and reuse anytime!

Here’s the link to your second free gift: link to these freebies has expired; check out my newer posts for new freebies.
This is a sample I had created with these freebies. We had celebrated our granny’s 80th birthday on Saturday, so I had created an 80 with the ‘DesignsbyShelle_Cherished-BG6’ background and also had printed out ‘DesignsbyShelle_Cherished-FlowerDoodle’ freebie twice which I had cut out and stuck at the sides of the 80. I had stuck the 80 in the balcony of granny’s house, so everyone could see it.


Here are the steps for you to create your birthday cut-outs:
• Open your My Memories Suite software and choose your album size (I had choosen for an A4 format).
• Click on your ‘Embellishments’ button and then on your ‘Browse Other...’ tab and insert the flower.
• Right click on the icon of your page which you see at the bottom of your screen and choose for ‘Insert Duplicate Page Mirrored’. So now you have two pages with two flowers.
• Now insert another blank page and click on your ‘Word Art Designer’ tab, then click on the ‘Add’ tab and now you can type in your number. I had typed in 8. Click on your ‘Fill’ tab of your ‘Word Art Designer’ and choose for ‘image’. Then click on the ‘Change’ tab and use the background you like from your freebies. Click on the ‘Stroke’ tab and pick a color with your picker. I had chosen the color of my flower. You can do this by clicking on your ‘picker’ tab and then clicking on ‘previous page’ and choosing your color. As simple as that!


You guys have fun with your freebies! I’ll see you guys next time!
XOXO,
Sharda

Saturday, February 4, 2012

Valentine's freebies

Hi everyone!
I’m back with this week’s new freebies!
Here’s the link for everyone to download these freebies: the link for these freebies has expired; check the newer posts for new freebies
Barbara Eastwick has a tutorial for you on how you can create Valentine’s Cards for your child’s class with these freebies HERE's.


The My Memories Suite software is so easy that even your child can create his/her own Valentine’s Cards. And remember, you can use my discount code STMMMS35043 to purchase your software.
Here are some advantages of purchasing the My Memories Suite Version 3 software:
• The cool thing is that with the discount code you will be the owner of this software for only $29.97!!!
• You will receive a $10 coupon, which comes with the software. With this coupon you can choose a kit for free at http://www.mymemories.com/ when the kit costs $10 or less. When you purchase something that’s over $10, it’s minus $10 off your purchase!
• You can download lots of kits at http://www.mymemories.com/ for free!!! The free kits at http://www.mymemories.com/ are available for a limited time and are replaced by other new kits. So you will never get bored working with this software, cause you will always have new items to work with, which are absolutely free!!!

You can create your Valentine’s card within a minute or two with this software. I have created a Valentine’s card and I’ve used items from the MMS software, the Cherished Wedding Pack and from the free kit Loved Ones Extras which I had downloaded from http://www.mymemories.com/ .

Here are the steps for creating this card:
• Open a blank page in MMS.
• Place a background by using the Background Papers tab on your Control Panel: Background Papers --> Purchased --> Weddings --> white petals --> OK
• Place some embellishments on your background: Embellishments --> Add --> Purchased --> Love --> Loved Ones Extras --> 2HeartsShdw --> Apply --> Weddings --> Cherished Wedding Pack --> Tags -->  4ever tag --> Apply --> Love --> Side by Side --> Perfect Couple --> Apply --> Close. So you now have all the embellishments on your page. Arrange the embellishments the way you like, make them a bit bigger or smaller if you like and you’re done!

You can use another background and/or embellishments to create your own unique Valentine’s card. Print out your card or save it for sharing through mail, fb etc. If you use packs which are created by StoryRock you could even sell your created card.;) Packs/kits sold at http://www.mymemories.com/ which are not created by StoryRock have their own policies, so if you use packs created by other parties, you will have to find out yourself if you are allowed to sell your created cards.


That’s it for today’s post! Do come back next week, cuase February is a month filled with love and I have something very special for you!!!
Sharda

Tuesday, November 29, 2011

Tutorial 2: How to insert embellishments into your album

Hey everyone!


I’m back! Well, the special news is, as some of you may know, that a newer version of My Memories Suite has arrived! In version 3, you will find everything you received in version 2 plus lots more album templates, papers, embellishments etc., so you can choose from thousands of items to work with and to create something unique and of your own. On the control panel you will find two new tabs: the ‘Imprints’ tab and the ‘Calendars’ tab.
Use my discount code: STMMMS35043 to get your discount on this software!!!
I’m going to continue with my previous tutorial. So you have to open your My Memories Suite software by double clicking on the MMS icon or by clicking on ‘start’ and then clicking on ‘My Memories Suite’. It may take a moment for your MMS program to open.


Your ‘New Album Options’ window will open, and because I’m going to work further with the album I was working on previously, I’m going to click on the thumbnail of my Jingle Bell album which is one of my five ‘Recent Albums’.


So now your album has opened.

You can zoom in or out to get a better look at your page or page elements. I’m going to click twice on the '-' tab to zoom my page out to 50%.You can also click on the Caron sign 'ˇ' next to the zoom percentage to choose a zoom option.

The left corner of my page looks a bit empty, so I want to add an embellishment to this corner. There are two options how you can add your embellishment: you can click on the ‘Embellishments’ tab from your ‘Control Panel’ on the right of your screen or you can click on the embellishments tab (the flower) from your ‘Resource Gallery’ on the left of your screen. I’m going to start by clicking on my ‘Embellishments’ tab from my ‘Control Panel’ to show you how it’s done from here. Your embellishment options will open up when you click on your ‘Embellishments’ tab. Click on ‘Add’.

You will now get your ‘Choose Embellishment’ window from where you can choose an embellishment. What you see on the left of this window is that all the embellishments are categorized, so this way it’s easy to find an embellishment.

I’m going to click on the ‘+’ of my purchased items. I can now choose from the items that are again categorized. I want a Christmas embellishment, so I’m going to click on the ‘+’ tab of ‘Christmas’, which is once again categorized. I’m going to choose for ‘A Gift for You’, which comes with the My Memories Suite V3 software. I love playing with embellishments and imprints. I’ll talk some other time about the imprints. So now I’m going to click on ‘Deer’ next, and I can now choose from three deers. I’m going to click on ‘Deer 2’ of the ‘Preview’ and then click on ‘Apply’ and then on ‘Close’.


I now have my chosen deer on my page, but it’s not where I want it to be. So I’m going to drag it to the place I want it to be with my mouse held in.


At the right on the ‘Control Panel’, you see all the options for your embellishment. You can give your embellishment a ‘Shadow’, ‘Mirror’ it, ‘Flip’ it, ‘Rotate’ it or change your ‘Opacity’. What I am about to do is to mirror my embellishment and change the opacity to make it matching with the grey on my page. To mirror it, simply click on the ‘Mirror’ tab, and to change the ‘Opacity’ value scroll to the left or type your opacity value and hit your ‘Enter’ key. I’m changing my opacity to 40. You can drag your embellishment again to have it exactly where you want it to be if you’re not satisfied. This is what I got.


You can click on your ‘Embellishments’ tab on your ‘Control Panel’ to hide all the options if you want to work with some other tab.
When you click on the embellishments tab from your ‘Resource Gallery’, you will get a better and bigger view of the embellishments. I recently worked with deer, that’s why I will get a view of all the deers. If I want to place another deer, I can double click on the image of the embellishment to get it on my page. By clicking on the ‘Select Category’ tab, you will find all the categories from which you can choose in the same way as from your control panel.


 I can hide my ‘Resource Gallery’ to get a better view of my page by clicking on the left-pointing double angle quotation ‘«’


What you also may have noticed is that the borders of your page are grey; this is the area that will be cropped when you print your album, so keep in mind that you don’t place embellishments and text that you want to be shown, in this area. When you are going to export you album to a JPEG file for example, and are not intending to print it out, you can place your text, embellishment(s) or imprint(s) in this area, cause they will appear normally on your JPEG file. If you don’t want the crop area to be shown, click on ‘View’, then go to ‘Guides’ and click on ‘Trim area-large photo album’ which is active, to make it inactive. So now you don’t see the grey border. If you are to print your album it’s better to leave the grey area or make your trim area active if it’s inactive.


That’s it for today’s tutorial!


This is something I had created with the pack from previous week. The green background is actually from this week’s giveaway pack. Featuring on the picture are Indian actor Gurmeet Choudhary and his wife, and the quote in hindi is from the Indian actress Priyanka Chopra.:D The quote says: “Don’t look at how many moments there are left in one’s life, but look at how much life there is in each moment”.

As no one has participated in this week’s giveaway, this pack is completely mine!!! I really love this pack!

I will be offering scrapbooking Freebies regularly, so you can start with your album for photo books, printing or online viewing by using them!
Do leave your name and e-mail in the comment section of this blog post for a chance to win the next set of Quick Pages next week!

Hugs and kisses,
Sharda

Tuesday, November 22, 2011

Tutorial1: How to add pictures to your designer template

Hey everyone!
I’m back with my first My Memories Suite tutorial. Follow my step by step instructions if you have purchased your software recently and you need some guidance to work with this software. If you still haven’t purchased this software you can always use my coupon code STMMMS35043 to get a $10 discount. Software also comes with a $10 coupon for downloads-a total value of $20! Just copy and paste the code to avoid typos when using it.

You can open your My Memories Suite Program by double clicking on your My Memories Suite icon or by clicking on ‘Start’ and then on ‘My Memories Suite’. Your ‘New Album Options’ window will open.


You now have two options from which you can pick; you can create an album with a designer template or you can build your own album. What you see at the bottom of this window are thumbnails of my recent albums. When you want to continue with your album some other time, you can easily click on the album you were working on to pursue further with your work. I’m going to work with a designer template today, so click on ‘Create Album From Designer Template’. A ‘Choose Designer Template’ window will open up now.


So now you have to choose a designer template. You can see how the designer templates look like on the picture at the right corner below. What you see on the picture above is how the template ‘A Day in the Life’ looks like. What you also may have noticed is that all templates come with a name, a theme, a size and the amount of pages they contain. The templates come in 8½" x 11" and 12" x 12" sizes, but you can convert them into other sizes.  ‘A day in the Life’ contains 7 pages, so when you have more pictures, the 7 pages will repeat itself when you choose for the ‘Fast Fill’ option. Christmas is not far away, so I’m now going to choose for the ‘Holiday Simplicity’ template.

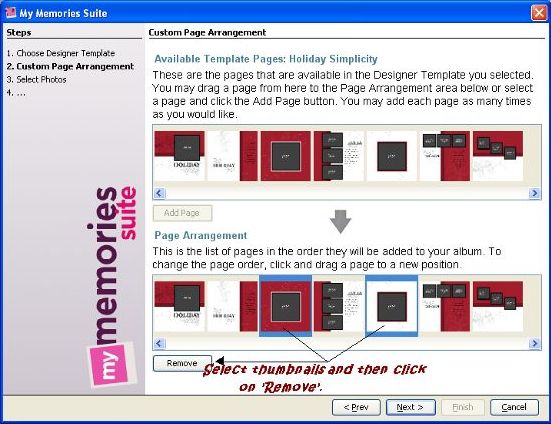
This template has the theme ‘Christmas’, it has a size of 12" x 12" and it contains 7 pages. So now click on ‘Next’. You will get a ‘Custom Page Arrangement’ window.


You can now remove, add, and/or place your pages in the order you like. To arrange the pages in a different way, simply drag the thumbnail images of your pages to the place where you want your pages in the ‘Page Arrangement’ bar. If you want to place some more pages, drag the thumbnails you want from the ‘Available Template Pages’ bar  to the ‘Page Arrangement’ bar below. If you want to remove some pages, click on the thumbnail on the ‘Page Arrangement’ bar, which you want to remove and then click on ‘Remove’. If you want to remove more then one page, hold your control key in and select those thumbnails and then click on ‘Remove’. I’m going to remove the 3rd and the 5th page and I’m going to add the last page as my third page now.

I now have 6 pages, but you can add as many pages as you like.

Now click on ‘Next’ when you’re done adding and removing your pages. You will now get a ‘Select Photos’ window from which your can choose from two options: ‘Pick and Click’ and ‘Fast Fill’. You can choose for the ‘Fast Fill’ option when you have lots of pictures and the order of the pictures isn’t important. For example, when you want the hundreds of pictures that you had taken on your campus trip quickly put together in an album, this is a great option. I’m going to work with the ‘Pick and Click’ option today.

Click on ‘Next’ if you have selected your option. You will now get a ‘Name Album’ window.


You can now change your Album Name and location if you like. I’m going to name my album ‘Jingle Bell’. And the next step is to click on ‘Finish’.


You now have your album opened in your ‘My Memories Suite’ software. This is the page that you will get.


At the left you have your ‘Resource Gallery’ and at the right you have your ‘Control Panel’. I’ll talk about these two in my second tutorial. You can see all the thumbnails of your pages in the bar at the bottom, so if you want to go to your second page, simply click on the thumbnail of your second page to view this page. You can also delete or drag your thumbnails in this bar. I’m going to keep it short this time; I’ll show you how you can add pictures to these templates. To add a picture, double click on the dark square area that you see. You will get an ‘Add Photo’ window now.


Go to the file where you have saved or stored your picture, then select your picture and then click on ‘OK’. You can choose from selecting the name of your picture or clicking on the thumbnail image on the right. I’ve chosen to click on my thumbnail image on the right. I hadn’t placed any pictures of our cat Kido out here for quite some time.:)


 Now, I have my picture in the picture frame of my template.

You can select the area that you want to be shown in the picture frame by double clicking on the picture. You will get your ‘Crop Photo’ window now.

So I’m just going to drag the bright area a little bit to the left. Click on ‘OK’ when you’re done.

So this is what I finally got.


That’s it for today’s tutorial. You can fill the other pages with your pictures if you like. Click on ‘File’ and then on ‘Save’ to save your work.

What do you guys think of this week’s Quick Pages?

Here’s the link for everyone to download these Quick Pages for free: Sorry, link has expired. Check out my newest post for new freebies.


I have great news this week; My Memories Suite is giving away an iPad 2 to a lucky winner very soon!!!
Do participate in this great giveaway of My Memories Suite. The only thing that you have to do is to like and share their page on Facebook at https://www.facebook.com/pages/MyMemories/140359372717593 . You can find the details at http://www.mymemoriesblog.com/2011/09/so-make-sure-you-check-out-mymemories.html . At the moment, they’re on 9,740 followers on Facebook, so be fast before they reach the 10,000!!! I would love it if not me, one of my followers would win this very cool giveaway.;) Nobody loses, cause you can download a Christmas kit for free on their Facebook page, just for liking their page.;)

I’m giving away another set of Quick Pages to some lucky winners next week. Leave your first name or nick name together with your e-mail address in the comment section of this post to participate in my giveaway.

And do visit my blog next week; I have something very special to share with you guys!;)


Hugs and kisses,
Sharda