Friday, March 23, 2012

Extra freebies this week!

Hey everyone!
I have something very special for you today! Guess what I have for you guys today...Candy Wrapper Freebies!!! I am pampering you guys with two sets of new freebies this week! These freebies can be used in any software, but I’m recommending the MMS software. If you don’t have this software yet, you can order it using my discount code STMMMS35043 ; you will get $10 off your MMS software purchase when you use this code at http://www.mymemories.com/ ! And remember, when you purchase your software using my code before the end of this month you will be eligible to receive a one year free RAKStar Membership worth $247.35!!! Isn’t that wonderful! Just mail me your receipt at ssewdien@yahoo.com for your free mega gift!;)
Here’s the link for everyone to download these freebies:
link to these freebies has expired; check out my newer posts for new freebies.
And here’s a sample I received from Liz.


You will definitely put a smile on your friend’s face by gifting a candy with a very special wrapping to him or her.

Here are the steps for you to create this candy wrapper:
• Open you’re My Memories Suite software and choose your album size (Liz has choosen 8.5 x 11” )
• Add the papers and elements you wish to use to create your own printable project
• Click ‘SHARE ALBUM --> EXPORT PAGES and save as a .jpg! The new .jpg papers you created are now usable as stand alone printable projects to use and reuse anytime!

Here’s the link to your second free gift: link to these freebies has expired; check out my newer posts for new freebies.
This is a sample I had created with these freebies. We had celebrated our granny’s 80th birthday on Saturday, so I had created an 80 with the ‘DesignsbyShelle_Cherished-BG6’ background and also had printed out ‘DesignsbyShelle_Cherished-FlowerDoodle’ freebie twice which I had cut out and stuck at the sides of the 80. I had stuck the 80 in the balcony of granny’s house, so everyone could see it.


Here are the steps for you to create your birthday cut-outs:
• Open your My Memories Suite software and choose your album size (I had choosen for an A4 format).
• Click on your ‘Embellishments’ button and then on your ‘Browse Other...’ tab and insert the flower.
• Right click on the icon of your page which you see at the bottom of your screen and choose for ‘Insert Duplicate Page Mirrored’. So now you have two pages with two flowers.
• Now insert another blank page and click on your ‘Word Art Designer’ tab, then click on the ‘Add’ tab and now you can type in your number. I had typed in 8. Click on your ‘Fill’ tab of your ‘Word Art Designer’ and choose for ‘image’. Then click on the ‘Change’ tab and use the background you like from your freebies. Click on the ‘Stroke’ tab and pick a color with your picker. I had chosen the color of my flower. You can do this by clicking on your ‘picker’ tab and then clicking on ‘previous page’ and choosing your color. As simple as that!


You guys have fun with your freebies! I’ll see you guys next time!
XOXO,
Sharda

Monday, March 5, 2012

Mega deal on purchasing your MMS software with my code!!!

Hey everyone!
I’m back with a great offer for ya’ll!!!
Everyone who buys My Memories Suite Software using my discount code STMMMS35043 during the period February 24, 2012 – March 31, 2012 is eligible to receive a One Year  RAKStar Membership for free!!! That’s a free HUGE Digital Scrapbooking kit every month – and it’s My Memories Suite compatible, so it’s like getting a free software content upgrade every month!!! Total one year value of $247.35; absolutely free with purchase of the MMS V3 software!!!

This is how it works: buy your My Memories Suite software by using my discount code and then e-mail me your receipt at ssewdien@yahoo.com .

Here’s the math for you:
$39.99 My Memories Suite Software
-$10.00 Using my promo code
----------------------------------------------
$29.99 Payment
+$10.00 in free merchandise
----------------------------------------------
+$19.95 RAKStar Membership each month
----------------------------------------------
=$29.95 Free Bonus!!!

Definitely an incredible deal for the best Digital Scrapbooking Software on this planet!

I also have freebies for everyone for this week!!! Here’s the link for everyone to download these freebies: link to these freebies has expired; check out the newer posts for new freebies.

These freebies can be used in any software. I’ve created a sample by using the embellishments of this pack and I’ve used the backgrounds for my WordArts. Great for creating your Holi postcards! The paint embellishments come with the MMS software and are from the pack ‘Building Blocks’.


Enjoy your Holi and wishing ya’ll a great day!!!
Sharda

Friday, February 24, 2012

New freebies and a new tutorial

Hey everyone!
This week, I have a new tutorial for you guys. This tutorial is showcasing My Memories Suite V3 on How to Find Purchased Content in your software. You can see how easy this software is and how your software gets upgraded with each compatible kit. Don’t forget to use the discount code STMMMS35043 if you’re interested in purchasing this software at www.mymemories.com ; you will get a $10 discount by using this code!;)
Here’s the tutorial link for you:  http://mymemories.us1.list-manage.com/track/click?u=2db59f577e9668b002ca5c0af&id=3399e9a712&e=e016845246

I also have new freebies for everyone this week. These freebies can be used in any software! These freebies include two 4” x 6” Quick Pages, and all the papers and elements used in creating them. The Quick Pages and elements are .png files and the papers are .jpg format. My Memories Suite Templates are auto installed in the software, but these are for everyone, even if you don’t have a My Memories Suite software!!! You can do lots of wonderful things with these freebies: create smaller projects like postcards, photos for printing et cetera or add elements to a larger layout and use it as a photo mat!
Here’s the link for everyone to download these freebies: Sorry, link has expired; check out the newer posts for new freebies. 


Just layer your photos behind the open box and add some text and you’re done! I’ve created a sample for you to see. I think that the designer forgot to create two open boxes in the Quick Page I’ve used; there’s only one open box, but you can layer your picture on top and then add the ric rac on top of the picture.


Don’t forget to participate in my My Memories Suite V3 software GIVEAWAY if you still haven’t participated yet. Check out my previous post for a chance to win Amazon’s #1 digital scrapbooking software.;)


Hugs and till next time!
Sharda

Monday, February 6, 2012

Valentine's GIVEAWAY

February is a month of love and gifts, so I am also giving away a free gift filled with love to a lucky winner. I am inviting everyone to participate in my free International Valentine’s giveaway! You can win a My Memories Suite Version 3.0 software worth $39.97 which is sponsored by My Memories Suite!

So what can you do with this software?
You can easily create professional looking postcards, covers for your essays, scrapbooks, photo books or DVDs with your videos and/or pictures you have lying around or which are somewhere deeply stored and hardly looked at. Think of all the wonderful pictures you will be taking soon: baby showers, birthdays, weddings, vacations, graduations etc. Wouldn’t it be nice having them printed out like a professional book? You can also e-mail your created layouts to your family and friends or place it on your facebook page. Check out my beauty and fashion blog CREATIVE D-ZINE to see some more samples of layouts I’ve created with this software. You can also read my 1st My Memories Suite giveaway post out there to know some more about this software. The rules are very simple, so do try out your luck. You do need internet connection on your PC or Mac to download and install this software. I won’t leave anyone empty handed, cause if you haven’t won the software, you will receive a free pack containing 2 Quick Pages and all the papers and embellishment used in creating them. You will be able to use these Quick Pages in any software.;) 

The rules for my My Memories Suite Version 3.0 software giveaway are:
• Follow this blog publicly via Google Friend Connect. If you already are a follower, you can skip this step.
• Go to http://www.mymemories.com/ and check out how many Page Elements the kit Luvbugs contains. (You can type in ‘Luvbugs’ in the search box to easily find this kit if you don’t see it. Click on the kit and you will find the descriptions of this kit. I’ve placed a picture of the Luvbugs pack below). Come back to my giveaway post and tell me in the comment section of this blogpost how many page elements the kit Luvbugs contains. Do leave your first name and e-mail along with your answer in the comment section so I can contact you.


Extra entries (+2) for people who have a blog and want to blog about this giveaway or want to place it on their sidebar. Do tell me in your comment if I have to count you in for extra entries.

Tips for people that have a bit of problem with the rules:
- If you don’t have a blog, you can use your Gmail account to follow my blog via Google Friend Connect. Simply sign in with your Gmail, open my blog and then click on the ‘Join this site’ tab on the side bar at the right. If you don’t have a Gmail, then you can sign up first.;)
- Simply click on ‘comments’ below (at the end of my Giveaway post), type in your comment in the blank comment box, and then click on ‘Publish comment’; as easy as that. When you are done you can sign out from Gmail if you prefer. If you don’t want your e-mail to be publicly visible, you can mail me your e-mail at ssewdien@yahoo.com , but you do need to place your first name and answer in the comment section of my blog to participate. If you have any questions at all you can send me an e-mail.

All the comments and entries will be publicly visible on my blog after the contest is closed, so there will be no cheating.;) Contest is open till the 29th of February 2012 12:00 AM EST.

Best of luck everyone!
Sharda

Saturday, February 4, 2012

Valentine's freebies

Hi everyone!
I’m back with this week’s new freebies!
Here’s the link for everyone to download these freebies: the link for these freebies has expired; check the newer posts for new freebies
Barbara Eastwick has a tutorial for you on how you can create Valentine’s Cards for your child’s class with these freebies HERE's.


The My Memories Suite software is so easy that even your child can create his/her own Valentine’s Cards. And remember, you can use my discount code STMMMS35043 to purchase your software.
Here are some advantages of purchasing the My Memories Suite Version 3 software:
• The cool thing is that with the discount code you will be the owner of this software for only $29.97!!!
• You will receive a $10 coupon, which comes with the software. With this coupon you can choose a kit for free at http://www.mymemories.com/ when the kit costs $10 or less. When you purchase something that’s over $10, it’s minus $10 off your purchase!
• You can download lots of kits at http://www.mymemories.com/ for free!!! The free kits at http://www.mymemories.com/ are available for a limited time and are replaced by other new kits. So you will never get bored working with this software, cause you will always have new items to work with, which are absolutely free!!!

You can create your Valentine’s card within a minute or two with this software. I have created a Valentine’s card and I’ve used items from the MMS software, the Cherished Wedding Pack and from the free kit Loved Ones Extras which I had downloaded from http://www.mymemories.com/ .

Here are the steps for creating this card:
• Open a blank page in MMS.
• Place a background by using the Background Papers tab on your Control Panel: Background Papers --> Purchased --> Weddings --> white petals --> OK
• Place some embellishments on your background: Embellishments --> Add --> Purchased --> Love --> Loved Ones Extras --> 2HeartsShdw --> Apply --> Weddings --> Cherished Wedding Pack --> Tags -->  4ever tag --> Apply --> Love --> Side by Side --> Perfect Couple --> Apply --> Close. So you now have all the embellishments on your page. Arrange the embellishments the way you like, make them a bit bigger or smaller if you like and you’re done!

You can use another background and/or embellishments to create your own unique Valentine’s card. Print out your card or save it for sharing through mail, fb etc. If you use packs which are created by StoryRock you could even sell your created card.;) Packs/kits sold at http://www.mymemories.com/ which are not created by StoryRock have their own policies, so if you use packs created by other parties, you will have to find out yourself if you are allowed to sell your created cards.


That’s it for today’s post! Do come back next week, cuase February is a month filled with love and I have something very special for you!!!
Sharda

Friday, January 20, 2012

This week's freebies and questions for you

Hey everyone!
It’s a New Year and a new time to renew, so I am going to ask you guys some questions.
Question 1: What do you guys like about my blog?
Question 2: What would you like to see more of on my blog?

These are this week’s freebies for everyone, but you have to participate in this week’s scavenger hunt in order to find and download them!;) Have fun finding them! (Hint: On which blog post is the link for this week’s freebies?)


Here’s a layout I created with this week’s freebies. I encourage everyone visiting my blog to try these freebies out! These are fast and fun, and a great way to embellish your photos. If you think that you can’t scrapbook, think again! With these free Quick Pages it is easy to just layer your pictures behind the page. Add a little journaling or extra embellishments if you wish and you’re ready for printing or saving for the web! If you need some help, please check my previous posts for tutorials.


I am getting lots of visitors on my blog, but not many people follow me out here. I would love having more followers out here, so please be a follower on my blog! Wishing you guys a wonderful day!!!
Sharda

Thursday, January 5, 2012

Tutorial 6: How to create your own calendar

I have a New Year’s gift for you guys this time! Everyone visiting my blog gets a special Quick Page. Don’t forget to unzip your Quick Page when saving it. This freebie can be used in any software.
Here’s the link for everyone to download this freebie:
Sorry, link has expired. Check out my newest post for new freebies.
Repaste this link in your browser, because it doesn't seem to open from my blog. A download window will open from where you can download this freebie.
You can add a picture with some text on this layout, then print your layout out and insert it in a blank 11 x 8.5” album. Follow my previous tutorial if you need help creating your album. It’s also possible to let the creator print and bind the perfect album for you in this size!!!

This is a finished sample from Liz Gardner from My Memories Suite.


What I am going to do today is, I’m going to show you guys how you can create your own calendar using this Quick Page. So start by opening your My Memories Suite Software. Choose the option ‘Create Album From Designer Template’. Now choose for an 11 x 8.5” album. I am just going to pick a Casual template. Click on ‘Next’.  We only need one page, so delete the rest of the pages by holding your control key in and selecting all the pages leaving just one; press the remove button when you’ve selected the pages.


Your pages have been removed, leaving only one page. Click on ‘Next’.


The ‘Pick and Click’ option is selected, so click on ‘Next’. You can change your album location and name if you want; I’m just going to leave it the way it is and I’m going to click on ‘Finish’.


My album with only one page has opened.


We don’t need the photo and text boxes, so select all the photo and text boxes, right click and choose for the option ‘Delete’. You can select the boxes one by one or you can use a window selection to delete all the items on your page. The window selection is done this way: place you arrow cursor at the upper right of your page, then hold your mouse in and draw a window to the bottom left of your page. The opposite can also be done to select all the items; this mean drawing a window from the upper left corner to the bottom right corner. All the items are now selected, so right click to delete them.


Now we have a completely blank page.


Now click on ‘EmbellishmentsàAddàBrowse other…’ and then go to the file where you have saved your Quick Page. Select the Quick Page and then click on ‘OK’ and then on ‘Close’.


We now have our Quick Page inserted on our blank page.


I’m going to add a calendar grid which I had downloaded from the free kits at http://www.mymemories.com/ . You can download it, if you haven’t done it yet, but you can also skip this step if you want. Go to ‘Embellishments’ and insert one of the calendar grids. My grids are too big, so I’m going to make it smaller. Simply drag the grids to the left or right so you can see the handles and make it smaller with the handles.


My Grids now have the width of the window on my layout.


Now click on the ‘Calendars’ tab on your Control Panel, then click on the ‘Add Month’ button. January 2012 appears automatically and you have your calendar on your page. I haven’t selected the ‘Lines’ function, because I already have grids. If you aren’t using grids you an also select ‘Lines’ to have lines between the dates.


We need to move the calendar onto the grids and make it a bit bigger with the handles. Stretch it a bit out to get the dates on the grids. Use the ‘Lock Object’ function to select the grids if needed.


Now right click and send the grids to the back. My dates are on the embellishments of my QP which doesn’t look nice, so I’m going to stretch in the grids and the calendar dates a little bit. If you make a mistake, you can simply click on the ‘Undo’ button.


I’m going to place a background for the window area of my layout. I’m doing this by using a ribbon. Click on ‘EmbellishmentsàAddàRibbonsàPlain Ribbon’ and then choose for the color ‘Bubblegum’ and then click on ‘Apply’ and then on ‘Close’.


We now have a ribbon on our page. Stretch it in and out and make it big enough to get the white area covered. Right click and send it to the back.


We now only need to personalize our layout a little bit. I’m going to add a picture of me and my cousins and nephew and some text and Word Art. The 2012 buttons are embellishments from the ‘Heritage Pack’; it costs only $0.99 at http://www.mymemories.com/; you can also use a Word Art or Text if you prefer.  I’m going to show you some other time how you can let your text follow a shape.


I’m going to do one last thing; I’m going to change the font of my calendar dates. Double click on your calendar dates; you will get a ‘Calendar Settings’ window. You can change your font, size, color and opacity of your header, lines and number. I’m only going to change the size of my header and numbers. The two Style buttons are for Bold (1st button) and Italic (2nd button). You may need to move the calendar dates a little bit.


Tada!!! This is my January Calendar page!


For your February page, right click on your thumbnail of your January page and choose for the option ‘Insert Duplicate Page’. So now you have a duplicated page. Change your text, Word Art and Picture. You can change the calendar dates by selecting the January calendar dates and changing the month on your Calendar tab on your Control Panel into February; your have your February calendar page ready in just one click.;) Here’s my February page!!! You guys complete the other pages in the same way.;) The pictures out here on my blog are not that clear because I have to resize them to be able to place it out here, but the picture quality actually is very good when you print it out and of course that’s the case when your picture itself is of good quality.;)
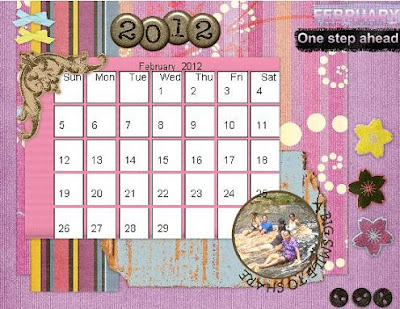

I think that you definitely want one of your own created calendars now, if you haven’t purchased this software yet. You can get a $10 discount using the code STMMMS35043 to purchase your My Memories Suite Version 3 software.;) If there are any questions you can place them on the comment section of this blog post. This week’s Quick Page was created with the content from my giveaway freebies, which I am giving away next week, so leave your name or nickname together with your e-mail address in the comment section if you want to participate in next week’s Quick Pages giveaway!
Love you guys,
Sharda